

If you have ever picked up a pocket hole jig thinking it would make your woodworking life easier, you already know the tool is capable of some genuinely strong joints. But here is the thing nobody tells you at the store: Don’t Make These 7 Pocket Hole Mistakes, because even experienced hobbyists mess these up more often than they admit.
I have watched plenty of first time builders drill a perfect looking hole, drive the screw in with confidence, and then wonder why their joint still wobbles or splits apart weeks later. The truth is pocket hole joinery is forgiving, but only up to a point. Once you understand where things typically go wrong, you can avoid wasted wood, stripped screws, and a lot of frustration.
1. Using the Wrong Drill Bit Depth
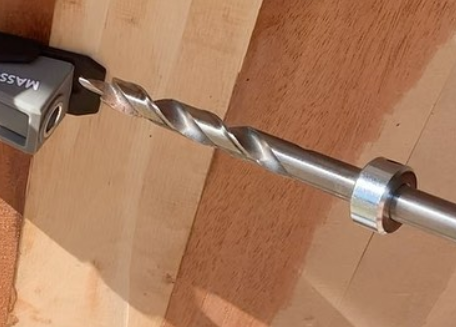
This is probably the single most common issue. Every pocket hole jig comes with a stop collar on the drill bit, and that collar exists for a reason. It controls how deep the bit travels into the material. If you set it too shallow, your screw won’t seat properly, and the joint feels loose.
Too deep, and you risk poking through the opposite face of your board, which ruins the piece entirely. Always match the drill depth setting to the thickness of your material. Most jigs include a simple chart for this, so there really isn’t an excuse to eyeball it.
2. Picking the Wrong Screw Length
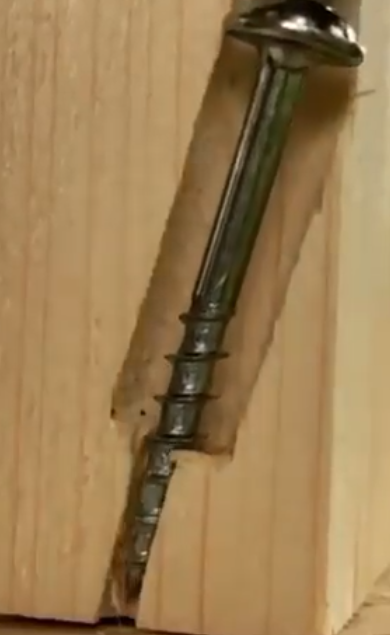
People assume any pocket hole screw will do the job, but length matters a lot more than most realize. A screw that is too long can poke straight through the second board, especially with thinner stock like three quarter inch plywood.
A screw that is too short might not grab enough material to hold the joint together under stress. As a general rule, use a shorter screw for material under an inch thick and a longer one for anything thicker. When in doubt, check the manufacturer’s screw selection guide that usually comes packaged with your jig.
3. Skipping Clamps During Assembly
Pocket hole screws are strong, but they are not magic. If your boards shift even slightly while you’re driving the screw, the joint can come out crooked or gapped. A lot of people skip clamping because it feels like an extra step that slows them down, but this is exactly where things go sideways.
A simple face clamp or right angle clamp holds everything in position so the screw does its job instead of fighting against movement. Skipping this step is one of those small mistakes that snowballs into a bigger problem later.
4. Drilling Too Close to the Edge
Pocket holes need a certain amount of material around them to stay strong. Drilling too close to the edge of a board weakens the wood right where you need strength the most, and it can cause splitting either during drilling or later when the joint is under load
Most jigs are designed with edge spacing built in, but if you’re working with narrow stock or an unusual angle, take a second to measure before you commit to drilling.
5. Ignoring Wood Grain and Material Type
Not all wood behaves the same way under a pocket hole screw. Softwoods like pine can split more easily, especially near the ends of a board, while hardwoods might require a slightly different screw type to avoid stripping.
Plywood and MDF also behave differently since they don’t have the same grain structure as solid wood. Adjusting your approach based on material type, rather than assuming every project behaves like the last one, saves you from cracked boards and stripped holes.
6. Overtightening the Screws
It feels natural to crank a screw down as tight as possible for a strong bond, but overtightening pocket hole screws can actually cause the wood to crack around the hole, particularly in softer material. It also risks stripping the pocket itself if you’re using a drill with too much torque.
A snug fit is usually all you need. If you feel resistance building suddenly and the screw hasn’t fully seated, stop and check what’s happening rather than forcing it further.
7. Not Sealing or Filling Visible Pocket Holes
This one is more about finishing than joinery, but it trips people up constantly. If your project has any visible pocket holes on a show face, forgetting to fill them with pocket hole plugs or wood filler makes the piece look unfinished no matter how solid the joint is underneath.
Planning your hole placement in advance, so it lands on the back or bottom of a project, saves you this extra step altogether. Pocket hole joinery really is one of the easier ways to build furniture, shelving, or cabinetry without years of practice behind you.
But like any tool, it rewards a bit of patience and attention to detail. Avoid these seven mistakes and your joints will hold up the way they’re supposed to, project after project.
FAQs
Do pocket holes really hold as well as other joints?
Yes, when done correctly, pocket hole joints can be surprisingly strong, especially for furniture and cabinetry that isn’t bearing extreme structural loads. The strength comes from proper screw selection and drill depth, not just the jig itself.
Can I use pocket holes on plywood?
Absolutely, plywood works well with pocket hole joinery as long as you choose the right screw length for the thickness and avoid drilling too close to the edge, since plywood can delaminate if stressed near its border.
Why do my pocket hole screws keep stripping?
This usually happens from overtightening or using the wrong screw type for your material. Hardwoods especially require a slower approach and sometimes a different screw style than the standard coarse thread version.
Should I always use glue with pocket hole screws?
It isn’t required, but adding wood glue to the joint before screwing it together adds extra strength and helps prevent any slight movement over time, particularly for furniture that will see regular use.
What is the best way to hide pocket holes on a finished project?
Wood plugs cut to match your material are the cleanest option, followed by sanding and finishing to blend them in. Wood filler works too, though it can be more visible depending on the wood type and stain you’re using.
Thanks for taking the time to read this guide! We hope it helped answer your questions. If there is anything you would like to add or ask, feel free to leave a comment below. You can also explore more helpful articles on our website.

I’m Alex, the voice behind Saw Mentor. With years of real, hands-on experience in the tools industry, I’ve learned one thing: the right tool makes all the difference.
At Saw Mentor, I share straightforward advice, honest reviews, and practical insights to help you make smarter decisions without the guesswork.