

If you have ever wondered how to cut cross lap joints with a circular saw, the good news is that you do not need a table saw or a router to get clean, strong results.
A cross lap joint is simply two boards that cross each other, each with a notch cut halfway through its thickness so they fit together flush. Woodworkers use this joint for frames, shelving supports, garden trellises, and small furniture bases because it is sturdy and looks tidy
once assembled. With a sharp blade, a square, and a bit of patience, a circular saw can handle the job just as well as more expensive equipment.
How to Cut Cross Lap Joints with a Circular Saw and What You Will Need
You do not need a huge toolbox for this project. A circular saw with a fine tooth blade, a combination square or speed square, a pencil, a chisel, a mallet, and some sandpaper will cover most of what you need.
A clamp to hold your workpiece steady is also a good idea since it keeps the board from shifting while you cut. Some people like to use a scrap piece of wood as a depth reference too, which can save you a lot of guesswork later on.
Step 1: Mark Your Boards
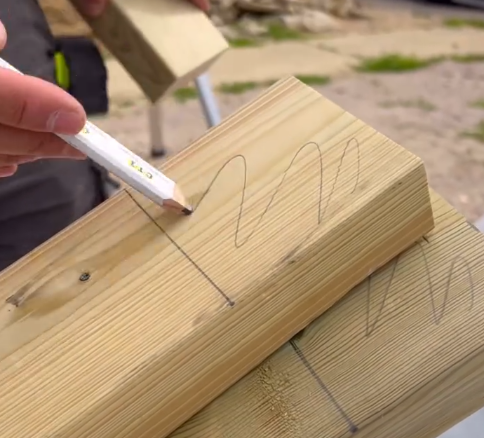
Start by laying the two boards where they will actually cross once joined. Mark the width of each board directly onto the other using a pencil, since this guarantees the notch will be the exact size needed rather than relying on a tape measure that might be slightly off.
Once the width is marked, use your square to draw straight lines across the face of the board connecting those marks. These lines define the edges of your notch.
Step 2: Set the Blade Depth
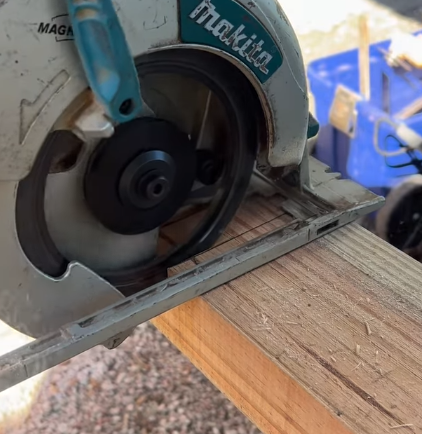
This step matters more than people expect. You want the notch to go exactly halfway through the thickness of the board, no more and no less, so that when the two pieces overlap they sit flush with each other.
Measure the thickness of your board and set your circular saw blade to half that depth. Test the setting on a scrap piece first. If the notch is too shallow or too deep, the joint will not sit flat, so take the extra minute to confirm before cutting your actual workpiece.
Step 3: Make the Outer Cuts
With your depth set, line up the saw blade along the outer marks you drew earlier and make your first two cuts along the width lines. These outer cuts define the boundaries of the notch and should be cut carefully and straight, since any wandering here will show up in the finished joint.
Keep the saw base flat against the board the entire time and let the blade do the work rather than forcing it through.
Step 4: Cut a Series of Kerfs
Between your two outer cuts, run the saw through the waste area several more times, spacing each cut about a quarter inch apart. This creates a row of thin fins of wood that are easy to knock out later.
Some people call this the comb method, and it is far easier than trying to remove a solid chunk of wood in one go with just a saw blade.
Step 5: Clean Out the Waste
Take your chisel and mallet and tap out the little fins of wood left behind by the kerf cuts. Work from the center outward and keep the chisel flat against the bottom of the notch so you do not gouge too deep. Once the bulk of the waste is gone, use the chisel to pare down any high spots until the bottom of the notch is flat and even.
Step 6: Test the Fit
Bring your two boards together and check how they sit. A good cross lap joint should slide together with light hand pressure, not require force, and not wobble loosely either. If it is too tight, shave a bit more material off with the chisel.
If it is loose, you likely cut a bit too deep somewhere, and you may need to add a thin shim or start over on that piece depending on how far off it is.
Step 7: Sand and Assemble
Once you are happy with the fit, sand the notch lightly to remove any rough edges from the chisel work. At this point you can glue the joint, add screws or dowels for extra strength, or leave it as a friction fit if the project allows for it. Either way, wipe away any excess glue before it dries so the joint keeps its clean look.
A little practice on scrap wood goes a long way here. The first joint you cut probably will not be perfect, and that is normal. Once you get a feel for setting the blade depth and controlling the saw through the kerf cuts, the whole process becomes fairly quick and repeatable.
FAQs
Can a circular saw really replace a table saw for this joint?
Yes, for most home projects, a circular saw does the job fine. A table saw offers more control for repeated identical cuts, but a circular saw with a steady hand and a clamped guide produces perfectly usable cross lap joints.
What blade should I use for cutting lap joints?
A fine tooth crosscut blade with at least 40 teeth gives cleaner results than a general purpose blade. Fewer teeth tend to leave rougher edges that need more chisel work afterward.
How deep should the notch be cut?
The notch should be cut to half the thickness of the board so that both boards sit flush when overlapped. Always test your depth setting on scrap wood before cutting the real piece.
Do I need glue if the joint fits tightly?
A tight friction fit can hold on its own for light duty projects, but glue or fasteners add reliability, especially for anything that will bear weight or sit outdoors.
What if my notch turns out uneven?
Uneven notches usually come from inconsistent blade depth or rushed chisel work. Slow down during the kerf cuts and check the notch with a straightedge before assembling, since fixing it early is much easier than after glue up.
Thanks for taking the time to read this guide! We hope it helped answer your questions. If there is anything you would like to add or ask, feel free to leave a comment below. You can also explore more helpful articles on our website.

I’m Alex, the voice behind Saw Mentor. With years of real, hands-on experience in the tools industry, I’ve learned one thing: the right tool makes all the difference.
At Saw Mentor, I share straightforward advice, honest reviews, and practical insights to help you make smarter decisions without the guesswork.