
If you’ve ever ripped a sheet of plywood and ended up with a wavy, splintered, or off-angle edge, you already know how frustrating it is. You measure twice, mark a clean line, and still the cut wanders.
The thing is, this problem is more common than most people admit, and it almost always comes down to a handful of fixable mistakes. Let’s break down exactly why it happens and what you can do about it.
The Blade Is the First Place to Look
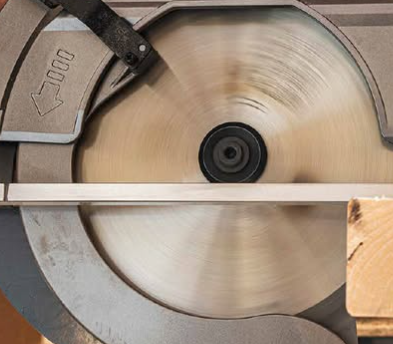
A dull or wrong blade is probably the number one reason plywood cuts go sideways, literally. Plywood is layered wood with alternating grain directions, and that cross-grain structure puts a lot of stress on a blade that isn’t sharp. When a blade starts losing its edge, it doesn’t cut cleanly through the fibers; it tears through them. The result is a ragged, uneven edge that looks like the blade was fighting the wood the whole way through.
The type of blade matters just as much as its sharpness. A general-purpose blade with 24 teeth might be fine for framing lumber, but for plywood, you really want something with 40 to 60 teeth. The higher tooth count means smaller, cleaner bites through each veneer layer.
Carbide-tipped blades hold their edge longer and make a noticeable difference in cut quality. If you’re still using a blade that came with your saw out of the box, that’s worth reconsidering.
Blade Depth Affects More Than You Think
A lot of people set their blade depth way deeper than it needs to be, usually out of habit. The common instinct is to expose as much blade as possible for a “powerful” cut. Actually, it works the opposite way for quality.
Setting the blade so it only extends about a quarter inch below the bottom of the plywood reduces tear-out significantly. When too much blade is exposed, the cutting angle becomes more aggressive, and the teeth are essentially ripping upward through the veneer on the underside of the sheet rather than slicing through it cleanly.
Also, the deeper the blade, the more blade surface is rubbing against the kerf walls. That friction can push the saw off course, especially over a long cut.
Your Saw Needs to Stay on a Straight Path
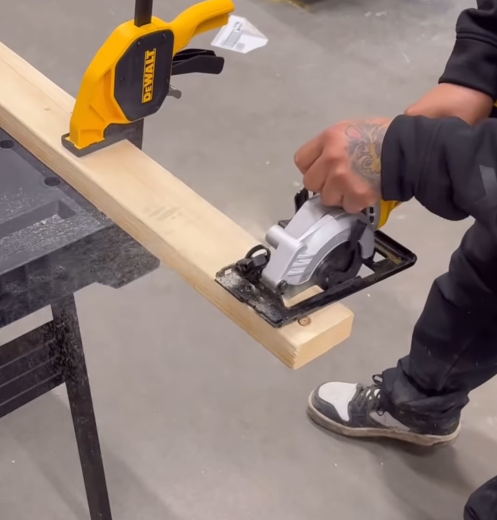
Here’s the honest truth: freehand circular saw cuts on plywood almost never come out straight. Not because you’re bad at it, but because there’s no mechanical reason they should. You’re holding a heavy, vibrating tool and walking it across an eight-foot sheet. Even a small hand wobble becomes a visible deviation over that distance.
The fix is simple, but people skip it anyway; use a straightedge guide. A manufactured aluminum track, a clamped level, or even a straight rip of MDF works perfectly. Clamp it parallel to your cut line, run the edge of your saw’s baseplate against it, and the blade has no choice but to follow a straight path.
If your cuts are consistently off by the same amount, you probably just need to account for the offset between the blade and the edge of the baseplate when setting your guide.
Also check your baseplate. If it’s bent, warped, or has a loose connection to the saw body, there’s flex in the system, and the blade will wander even with a guide.
The Blade Guard and Fence Alignment
On saws with a rip fence attachment, even a small amount of misalignment in the fence causes the blade to drift. This is the leading cause of a cut that starts straight and then gradually curves toward or away from the fence.
Pull out the fence and check that it sits perfectly parallel to the blade by measuring from the fence to a blade tooth at the front, then at the back. If those numbers don’t match, adjust until they do.
For saws without a rip fence, make sure the blade itself is aligned with the slot in the baseplate. A blade that’s even slightly canted will track off-line no matter how steady your hands are.
Blade Wobble Is a Separate Issue from Dullness
Sometimes a blade is reasonably sharp but still cuts unevenly because it wobbles. This happens when the arbor nut isn’t tightened properly, when the blade isn’t seated flush against the arbor flange, or when a blade has a slight warp from overheating. A warped or wobbling blade will leave a kerf wider than it should be, and the cut edges will have a slight scalloped texture.
Before you make any cut in plywood, give the blade a quick visual spin by hand with the saw unplugged. Any noticeable side-to-side wobble means the blade needs to be reseated or replaced.
How You Support the Plywood Changes Everything
Plywood supported only at the ends will sag in the middle and pinch the blade as you cut, which slows the saw down and deflects the blade. The deflection shows up as an uneven edge. A full sheet needs to be supported across its whole length, not just at two points.
Foam insulation boards laid on the ground work great as a cutting table; they’re cheap, flat, and the saw blade can cut slightly into them without damage. Some people use a few 2x4s spaced across sawhorses. The key is that the plywood doesn’t flex or close in on the blade during the cut.
Also, never try to cut a full 4×8 sheet while it’s hanging off one end of a sawhorse. The sheet will tip, pinch, and give you a terrible cut even if everything else is perfect.
Cutting Speed and Pressure Play a Role Too
Pushing the saw too fast doesn’t give the blade enough time to clear chips properly, which leads to burning and deflection. Going too slow lets the blade heat up, and the friction can push it sideways. The right speed is somewhere in the middle, a steady, controlled feed rate where you can hear the motor working but not straining.
Don’t press down on the saw. The weight of the saw itself is usually enough. Extra downward pressure just increases friction and actually makes steering harder because it creates more drag on the baseplate.
Saw Blade RPM and Power
An underpowered saw or one with a worn motor will lose speed when it hits a dense section of plywood. As RPM drops, the cut quality drops with it. Blade speed is what allows clean, consistent chip removal.
A saw with adequate amperage for its blade size holds its RPM through the cut and produces much better results. This is one area where the cheap saws genuinely show their limits on hardwood plywood or thick material.
FAQs
Why does my circular saw leave a rough, splintered edge on plywood even when I cut slowly?
Splintering usually means your blade has too few teeth or is dull. Try a 40-60 tooth carbide blade and make sure the good face of the plywood is facing down when cutting with a circular saw, since the blade cuts upward on that side. Applying painter’s tape along the cut line before scoring it also helps reduce tear-out on the top face.
Can a bent or warped baseplate cause uneven cuts?
Yes, it absolutely can. The baseplate is what keeps the saw riding flat on the plywood surface. If it’s bent or twisted, the blade tilts slightly through the cut, producing an edge that isn’t square. Set the saw on a flat surface and look for any rocking. Even a small warp adds up over a long cut.
How do I know if my circular saw blade is aligned properly?
Unplug the saw, retract the guard, and use a small square against the baseplate and blade body. The blade should sit at exactly 90 degrees to the baseplate for a square cut. Most saws have a bevel adjustment. If yours has drifted slightly from zero, that’s your problem.
Is it better to score the line first before making the full cut?
For fine finish cuts, yes. A shallow scoring pass, maybe an eighth of an inch deep, severs the top veneer fibers before the full-depth cut goes through. This dramatically reduces tear-out on the visible face. It takes an extra pass, but the edge quality is much cleaner, especially on pre-finished or hardwood plywood.
Does the direction I cut plywood matter for edge quality?
It does, but the more important thing is knowing where your blade exits the material. Circular saw blades cut on the upstroke on the bottom face, so that’s where tear-out occurs. Whatever face you want to look clean should be face-down when cutting with a circular saw. If that’s not possible because of the layout, a track saw or scoring pass will help.

I’m Alex, the voice behind Saw Mentor. With years of real, hands-on experience in the tools industry, I’ve learned one thing: the right tool makes all the difference.
At Saw Mentor, I share straightforward advice, honest reviews, and practical insights to help you make smarter decisions without the guesswork.